Pro: calculations
With the Pro package geosit does the everyday surveying calculations on the project points: how far apart two points are and in which direction, and where a point lies that the receiver cannot reach (the corner under the eaves, the center of a tree, a peg beyond the wall), starting from known points and from measurements taken with a tape or a compass. The computed point is created in the project or staked out, like a point snapped on a drawing.
The Pro package is needed
The command is there only with the Pro package (Settings → License, Packages row). During the trial days everything is included.
Opening the calculations
In the survey, the Calculations command is the last one in the column on the right of the map (two crossing lines). It appears only with the receiver connected (the demo receiver too), not in the stakeout.
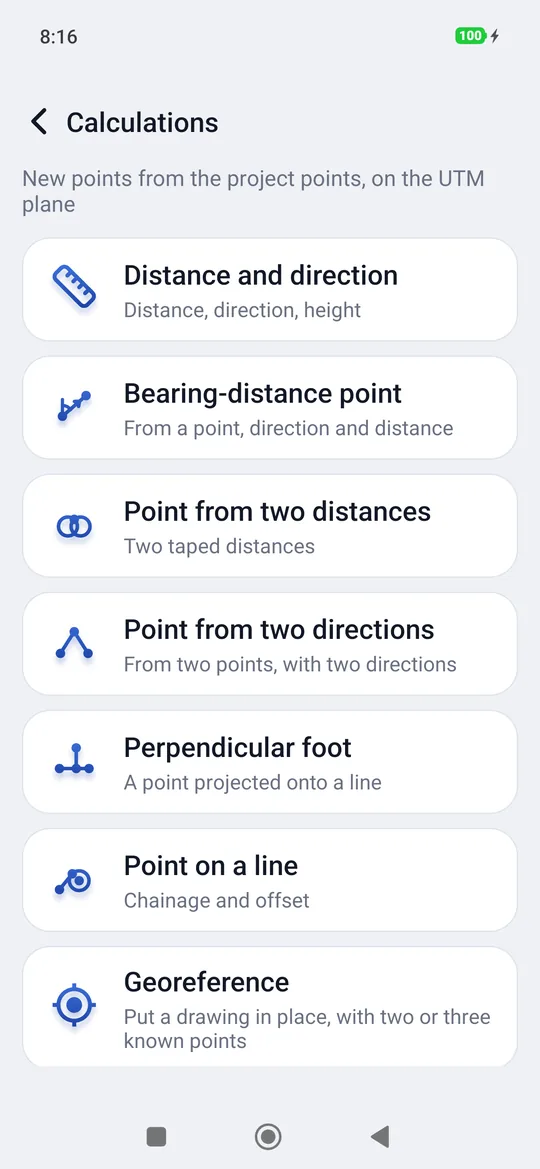
| Calculation | What it needs | What it gives |
|---|---|---|
| Distance and direction | Two points, A and B | Distance, direction from A towards B and back, height difference, slope distance and grade |
| Bearing-distance point | A point A, a direction and a distance | The point at that distance, in that direction |
| Point from two distances | Two points and the distance from each | The point, to the left or right of someone going from A towards B |
| Point from two directions | Two points and the direction from each | The point where the two directions meet |
| Perpendicular foot | A line A–B and a point to project | The foot on the line, how far the point is from it and on which side, and the chainage from A |
| Point on a line | A line A–B, the chainage and the offset | The point at that distance from A along A→B, moved right (+) or left (−) |
At the bottom of the list there is always Georeference: it goes back to the map and puts a drawing in place with two or three known points (see Georeferencing a drawing). If the project has no drawings yet, a notice says to load one first: Projects, Import, and the DXF file.
How to use it
- Tap a calculation.
- Tap Tap to choose a point and pick the point from the project list (the most recent at the top). Do the same for the other points.
- Enter the measurements: distances in meters, directions in degrees from north, clockwise (90 is east). A comma works like a dot.
- The result appears right below, as you type.
- Create opens the New point window already filled in, with the next name; Insert saves it in the project. Stake out opens the stakeout on that point without saving it: the target is called «Calculations».
The arrow at the top with the name of the calculation, or the back key, returns to the list of calculations; from the list it returns to the map.
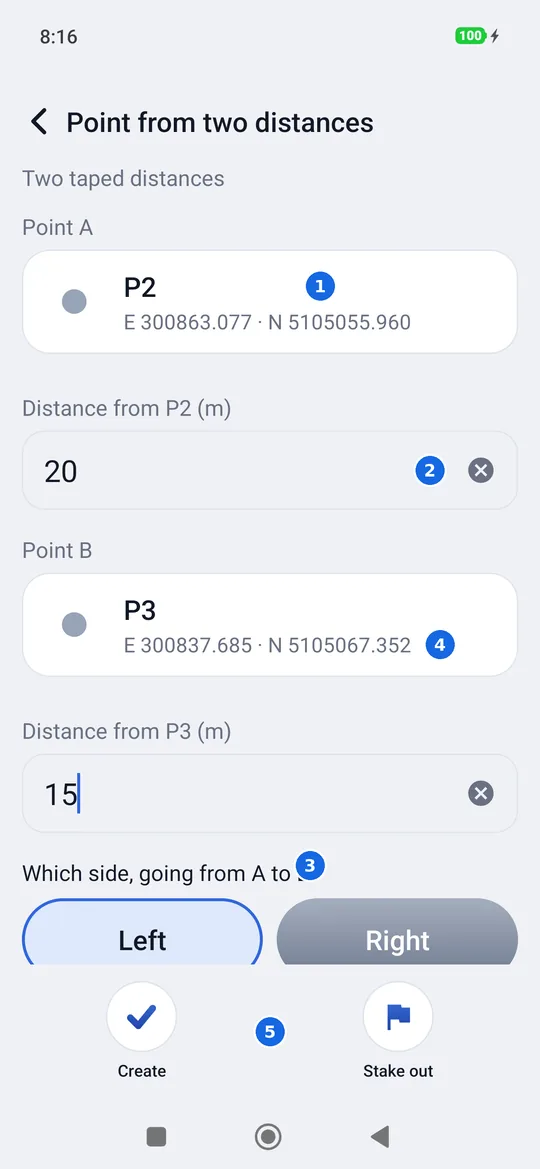
- A known point: tap it to choose another point of the project.
- A measurement, here the distance from A taken with the tape.
- Which side: two distances meet in two points, one on each side of the line A→B. Choose the right one: geosit does not guess.
- The result, in plane coordinates in the project's reference system.
- Create or Stake out the computed point.
When the calculation fails
If the data are not enough or do not fit together, instead of the result you see the reason, in red, and Create and Stake out are not there:
- the two distances do not meet, or one lies entirely within the other;
- the two directions are parallel, or they meet behind the two points;
- A and B coincide, so they do not define a line.
On the plane, in meters
The calculations are done on the plane of the project's reference system, as in a CAD: the distances are those the client finds on the drawing. The computed point has no height: if you need one, enter it in the New point window. The height difference of Distance and direction uses the project heights (ellipsoidal or above sea level); if a point has no height, it says so.
Point from the camera (LiDAR)
Only on iPhone and iPad Pro with LiDAR (not on Android): a point you cannot reach, such as a corner, a manhole or the foot of a tree behind a fence, is measured by framing it, up to 5 m. It appears only with the external receiver connected: the tie point needs FIX. On an iPhone without LiDAR the item is shown with “Only on iPhone Pro models with LiDAR”.
- Mount the phone on the pole, below the antenna, and enter where the antenna is from the camera, with the phone upright seen from the screen: right, up and behind, in metres (a negative number for left or in front). Usually “Up” is enough; the other two correct the centimetres of a mount that is not exactly below the antenna.
- With the receiver in FIX, hold the phone still and tap Tie point: there is only one.
- Walk 3 m with the pole, pausing now and then: at each pause the app takes the position by itself, and below you see how far you have walked. At 3 m “Direction ready” appears with the uncertainty at 5 m (green up to 5 cm, orange up to 25, red beyond). Without walking, as with a total station: if a point of the job already measured (a nail, a stake, a corner) is 2 to 6 m away, aim the crosshair at it, tap Known point and pick it from the list: the direction is ready at once. If the point under the crosshair is not at the distance of the one chosen, the app says so.
- Aim at the point with the crosshair and tap Measure: East, North, height and distance appear.
- Create or Stake out the point, as in the other calculations. This point has a height.
Camera and tie points
The tie point gives the position; the walk gives the direction the camera faces, which the phone's compass would get wrong by a few degrees, that is tens of centimetres at 5 m. If the camera stops (a call, the app in the background) the orientation is lost: take the tie point and walk again.